A plain canvas shopper bag is useful, sturdy, and easy to carry, but its blank surface can feel a little forgettable. The good news is that small changes can give it character without making it less practical. This guide explores how to dress up a plain canvas shopper bag with approachable ideas, from fabric paint and iron-on patches to colorful handles and simple stitched details.
The best choice depends on how you use the bag. A shopper that carries books every day needs durable decoration, while a light market tote can handle more delicate touches. Start with a clean, dry bag, check care labels, and test paint or adhesive on a hidden area. Small details matter. A few careful stitches can last longer than a large decoration attached in a hurry.
The ten ideas ahead offer options for different skill levels, budgets, and personal styles. Some use supplies you may already have at home; others call for a little planning. Not every idea will suit every bag, and that is worth considering before you begin. Heavy embellishments may strain the fabric, while certain paints can leave it stiff. Keep the bag’s shape, intended use, and cleaning needs in mind. The goal is not to make a simple shopper look expensive. It is to make it feel more like yours, with details that hold up to real use.
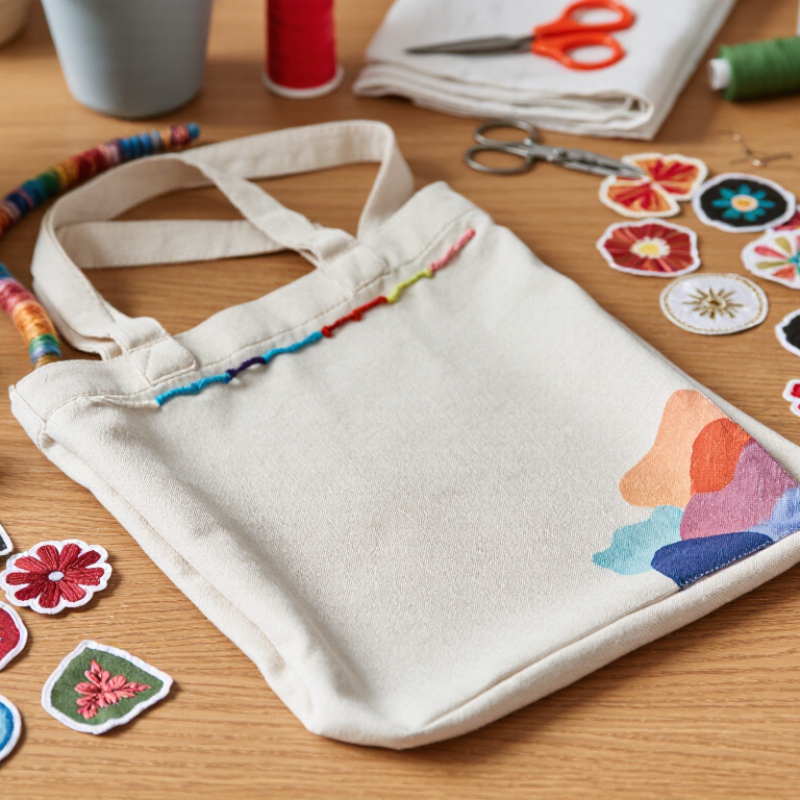
Before adding anything, empty the canvas shopper and check its seams, handles, and surface for loose threads or stains. Brush away dust, then spot-clean with mild soap and a damp cloth. Let the bag dry completely; damp canvas can make paint or adhesive behave unpredictably. Slide a piece of cardboard inside to keep marks from bleeding through. Keep it simple.
Lay the bag flat and smooth out deep creases without stretching the fabric. Test your chosen paint, marker, or fabric adhesive on an inconspicuous corner first, since canvas textures and finishes vary. Wait for the test to dry. A color that looks bright when wet may turn dull, and that can change the whole plan. I would rather discover that on a hidden edge than across the front panel.
Choose a decorating approach that suits how you use the bag. Fabric paint works well for bold shapes, while embroidery adds raised detail but takes more time. Iron-on patches are quick, though some shopper bags have seams or coatings that make heat application difficult. Sketch a small layout on paper, then place it on the bag before committing. Leave space near the handles and bottom corners, where rubbing can wear details down. The first arrangement may feel awkward. Move pieces around until the design feels balanced, even if it is not perfectly symmetrical.
Color can turn a plain canvas shopper into a bag that feels personal without adding bulky decorations. Check the care label before choosing a method. Many shoppers are cotton, but blends can take dye unevenly. Wash the bag first to remove sizing, then test your paint or dye on an inside seam. Small test first. Fabric paint works well for bold shapes and fine details. Slide cardboard inside the bag to stop color reaching the other side. Dab paint through a stencil with a nearly dry sponge, keeping the stencil still. Too much paint can seep beneath the edges.
For an all-over shade, use dye suited to the bag’s fiber and follow its instructions for water temperature and rinsing. Wet canvas may look darker than it will when dry, so check the color before adding more dye. Stencils let you layer simple shapes, such as leaves or narrow stripes, but leave space between them so the design stays clear. Let it dry fully. Set paint with heat only if its directions allow, using a pressing cloth to protect the fabric. A slightly wobbly edge may remain; I’d rather keep that small flaw than overload the canvas with another coat.
A plain canvas shopper bag gives you a sturdy surface for a personal pattern. Arrange fabric patches or appliqués on the bag before attaching them. Try a loose row of tiny flowers, a bold corner shape, or scattered geometric pieces. Keep the handles clear so they remain comfortable to grip. Sew patches with small, even stitches, especially around edges that may catch on keys or books. For embroidery, sketch a simple motif with washable fabric marker first. A leaf, sunburst, or dotted border works well on coarse canvas. Check the care label before washing; some trims may shrink or fray.
Tips: Test marker and thread on a hidden area. Use a thimble if the needle meets resistance. Pin pieces in place, then step back and check the spacing. Small changes help.
Patterns do not need perfect symmetry. A slightly uneven line can feel handmade, though crowded details may make the bag look busy. Leave some canvas visible between motifs. If you combine embroidery with appliqués, stitch the appliqués down before adding nearby details. This keeps the fabric flatter while you work. Let any fabric adhesive fully dry before using the bag, and remember that heavy decorations can pull on thin canvas. A simple layout is easier to repair later.
A practical comparison of decorative techniques, suggested materials, approximate project times, and care considerations.
| # | Decorating Idea | Materials | Application | Skill Level | Typical Time | Care Consideration |
|---|---|---|---|---|---|---|
| 1 | Iron-on patches | Fabric patches with heat-activated adhesive; pressing cloth | Position the patch and press with an iron according to its instructions; stitch around the edge for extra security if desired. | Beginner | 10–20 minutes | Follow the patch maker’s heat and washing instructions; test the iron on a hidden area first. |
| 2 | Hand-stitched appliqué | Cotton fabric scraps, needle, thread, pins, and scissors | Cut a simple shape, pin it to the bag, and sew around its edge with a running stitch or blanket stitch. | Beginner to intermediate | 30–60 minutes | Prewash fabric scraps when possible to reduce color transfer or shrinkage. |
| 3 | Simple embroidered motif | Embroidery floss, hand-sewing needle, and embroidery hoop | Transfer a small outline onto the canvas and fill it with basic stitches such as backstitch, satin stitch, or French knots. | Beginner to intermediate | 45–120 minutes | Turn the bag inside out before gentle washing to help protect the stitching. |
| 4 | Decorative fabric panels | Printed cotton, fabric scissors, pins, and needle and thread or sewing machine | Cut a panel to size, fold under raw edges, and sew it onto the front of the bag. | Intermediate | 45–90 minutes | Choose a washable fabric and secure all panel edges to limit fraying. |
| 5 | Felt shape appliqués | Wool-blend or craft felt, needle, embroidery floss, and scissors | Cut shapes such as leaves, stars, or initials, then attach them with small hand stitches. | Beginner | 20–45 minutes | Hand-wash gently if needed; some felt can shrink or distort with heat and agitation. |
| 6 | Embroidered initials | Embroidery floss, needle, washable fabric marker, and optional hoop | Mark two or three letters lightly and stitch their outlines with backstitch or stem stitch. | Beginner to intermediate | 30–75 minutes | Check that the marking pen is removable on a fabric scrap before drawing on the bag. |
| 7 | Layered patch collage | Several small fabric patches, pins, and needle and thread | Arrange patches in an overlapping composition, then sew around each piece so the layers stay in place. | Intermediate | 45–90 minutes | Secure overlapping edges with stitching to help prevent lifting during use or washing. |
| 8 | Running-stitch pattern | Embroidery floss or perle cotton, needle, and ruler or washable marker | Stitch rows, borders, or simple geometric lines directly into the canvas. | Beginner | 30–60 minutes | Keep stitches evenly spaced and avoid pulling the thread too tightly, which can pucker the fabric. |
| 9 | Raw-edge appliqué with fabric adhesive | Fabric pieces, fabric adhesive, and scissors | Cut shapes, apply adhesive as directed, and allow the bond to cure for the time stated on its packaging. | Beginner | 20–40 minutes, plus curing time | Washability depends on the adhesive; follow its label and test on a small fabric piece first. |
| 10 | Small embroidered border | Embroidery floss, needle, ruler, and optional hoop | Add a stitched border along the top edge, pocket, or lower corners using a repeating line or simple leaf motif. | Beginner to intermediate | 45–90 minutes | Keep decoration clear of seams and handles, and wash the bag gently to reduce wear on the thread. |
Times are approximate for a small, straightforward design and can vary with the bag’s thickness, pattern complexity, and sewing experience. Always follow the care instructions for the materials used.
Wrap each handle with a narrow cotton ribbon, leaving a small gap near the seams so the fabric can bend comfortably. Tie the ends into flat knots, then add a few wooden beads or a removable fabric charm. Keep embellishments light; heavy metal pieces can pull the handles out of shape. For a tidy finish, measure both handles before cutting ribbon. A slightly uneven bow is not a disaster, though it may bother you later.
Textile Exchange’s 2023 Materials Market Report estimated that global fiber production reached 116 million tonnes in 2022 and could rise to 147 million tonnes by 2030. That scale makes using what you already own a practical choice. Refreshing a sturdy shopper with washable, removable decorations can help you enjoy it longer, though it does not replace careful material choices. Check the bag’s care label before adding anything that could bleed color or snag the canvas.
Tips: Test ribbon or fabric dye on a hidden corner first. Use a few stitches to secure a charm, rather than strong glue, which may stiffen the handle. Leave room for your hand. A small detail often looks better than a crowded row of accessories.
Once your shopper’s design is dry, follow the paint or adhesive maker’s curing instructions before using the bag. Test any heat-setting method on a hidden seam first; canvas can shrink or scorch. Let it rest. Place a clean pressing cloth over painted areas, and avoid ironing directly on raised details. Keep the bag away from damp surfaces while the finish cures. Textile Exchange’s 2024 Materials Market Report estimates that global fiber production reached 124 million tonnes in 2023. Caring for a finished textile item can help it stay useful longer, though no coating makes a design indestructible.
For routine care, turn the bag inside out and wash it only when needed, using cool water and a gentle cycle. Use mild detergent. Skip bleach and rough scrubbing, which can fade color or loosen stitching. Air-dry the bag flat or hang it by its handles, away from strong sunlight. Remove detachable decorations before washing; hand-clean delicate beads or glued pieces instead. Even careful sealing cannot make a painted bag stain-proof. It is worth checking the design after its first wash, since small cracks or color transfer may show up then.
Arrange patches before sewing them on. Try tiny flowers, a corner shape, or scattered geometric pieces. Leave some canvas visible.
Sketch a simple motif with washable fabric marker. Test the marker and thread on a hidden area. A leaf works well.
Sew around their edges with small, even stitches. Pin each piece, then step back and check the spacing. Small changes help.
Wrap them with narrow cotton ribbon, leaving gaps near the seams. Use light beads or a removable charm. Leave room for your hand.
Secure it with a few stitches instead of strong glue. Glue can stiffen the handle. Keep decorations light.
Follow the product’s curing instructions before using it. Keep the bag away from damp surfaces while the finish cures. Let it rest.
Turn it inside out and wash only when needed, using cool water and a gentle cycle. Use mild detergent. Air-dry it away from strong sunlight.
Place a clean pressing cloth over painted areas. Do not iron directly on raised details. Test heat on a hidden seam.
Look for small cracks, loose stitching, or color transfer. Even careful sealing cannot prevent every stain. A crooked detail may still bother you later.
Transforming a plain canvas shopper into a personal accessory starts with preparing the bag: clean it, let it dry, and choose a decorating style that suits its intended use. Add color with fabric paint, dye, or stencils, using simple shapes or layered colors to create a design that feels distinctive. For extra texture and character, apply fabric patches or appliqués, or add embroidered details such as small motifs, borders, or initials.
The handles offer another opportunity to personalize the bag with fabric wrapping, stitching, or tasteful decorative accessories. Once the design is complete, allow all materials to dry or set fully before using the shopper. Protect the finished decoration with a suitable fabric-safe finish when appropriate, and care for the bag according to the materials used. With a little planning and creativity, how to dress up a plain canvas shopper bag becomes an easy project that turns an everyday tote into a useful expression of personal style.
